- Getting Started With Starter Templates
- Install Starter Templates
- Premium Starter Templates – Install and Activate License
- Building Your Website With Starter Templates
- How to import Starter Templates with WP CLI Command
- Starter Templates — FAQs and Basics
- Understanding Starter Templates Compatibility Across Themes
- Starter Templates – Patterns
- Why You Need to Connect Starter Templates with ZipWP AI Website Builder
- Create Multilingual WordPress Websites with Starter Templates
- Getting Started With Starter Templates
- Starter Templates Importing
- How to Import A Complete Site With Starter Templates?
- How to Import Single Page With Starter Templates?
- Importing Gutenberg Pages, Patterns, and Kits
- Starter Templates – Elementor Popup
- How to Fix Starter Template Importing Issues
- Building Your Website With Starter Templates
- Starter Templates FAQs
- How to Import A Complete Site With Starter Templates?
- How to Import Single Page With Starter Templates?
- Can I Import Starter Templates Site on Existing Website?
- Importing Gutenberg Pages, Patterns, and Kits
- How to Fix Starter Template Importing Issues
- How to Fix Operation Timed Error While Importing a Starter Template?
- How to Fix Blocked Requests Error While Importing a Starter Template?
- How to Fix 5XX Error While Importing a Starter Template?
- Starter Templates Importing
- How to import Starter Templates with WP CLI Command
- Error 406 while importing Starter Templates on your WordPress website
- We are facing a temporary issue in importing this template
- Required for Import: Enable Elementor’s Container
- Select Preferred Page Builder While Importing Classic Starter Templates
- Starter Templates – Free Images from Pixabay
- Starter Templates – Restore Customizer Backup
- Mountain Template With Elementor Theme Style
- Filter to Remove Starter Templates Button on Post Types
- How to Enable/Disable Elementor While Importing Starter Templates
- How to Set Block Editor as the Default Page Builder In Starter Templates
- How to Set Up Your E-Commerce Store With Starter Templates
- How to Enable Single Page Import Button with White Label
- How to Process Refund Requests?
- How to Enable/Disable Legacy Beaver Builder Support in Starter Templates
- How To Reset WordPress Installation?
- XMLReader Support Missing – Starter Templates
- cURL Support Missing – Starter Templates
- Required File Permissions Missing – Starter Templates
- Disable Debug Mode – Starter Templates
- Update Required Plugins – Starter Templates
- Starter Templates — FAQs and Basics
- Starter Templates – Required plugins missing
- Plugin Installation Failed – Multisite
- System Requirements – Starter Templates
How to Import A Complete Site With Starter Templates?
Starter Templates allows you to import ready and beautifully built demos to your website. Most importantly, when you import a complete site, your whole website is ready in a few minutes.
You get ready-made designs, dummy content, images, and styles you can customize and personalize.
In this article, we’ll show you how to import a complete site with Starter Templates directly from your WordPress Dashboard. We will cover both the Free and Premium Templates.
Importing Free Templates
The first step to importing the free templates is to install the Starter Templates plugin. The plugin provides two sets of templates, free and Premium. You can learn how to install the free plugin here.
Once you install and activate the plugin, you can import Starter Templates.
Previewing Templates
Normally, this section should show up automatically after activating the Starter Templates plugin. But if it doesn’t follow these steps:
Step 1: Navigate to Appearance > Starter Templates.

You can select your preferred page builder: Elementor, Block Editor, or AI Website Builder.

If you want to see our classic templates, click the “Build with Templates” button. This will open the website templates library and styling options.

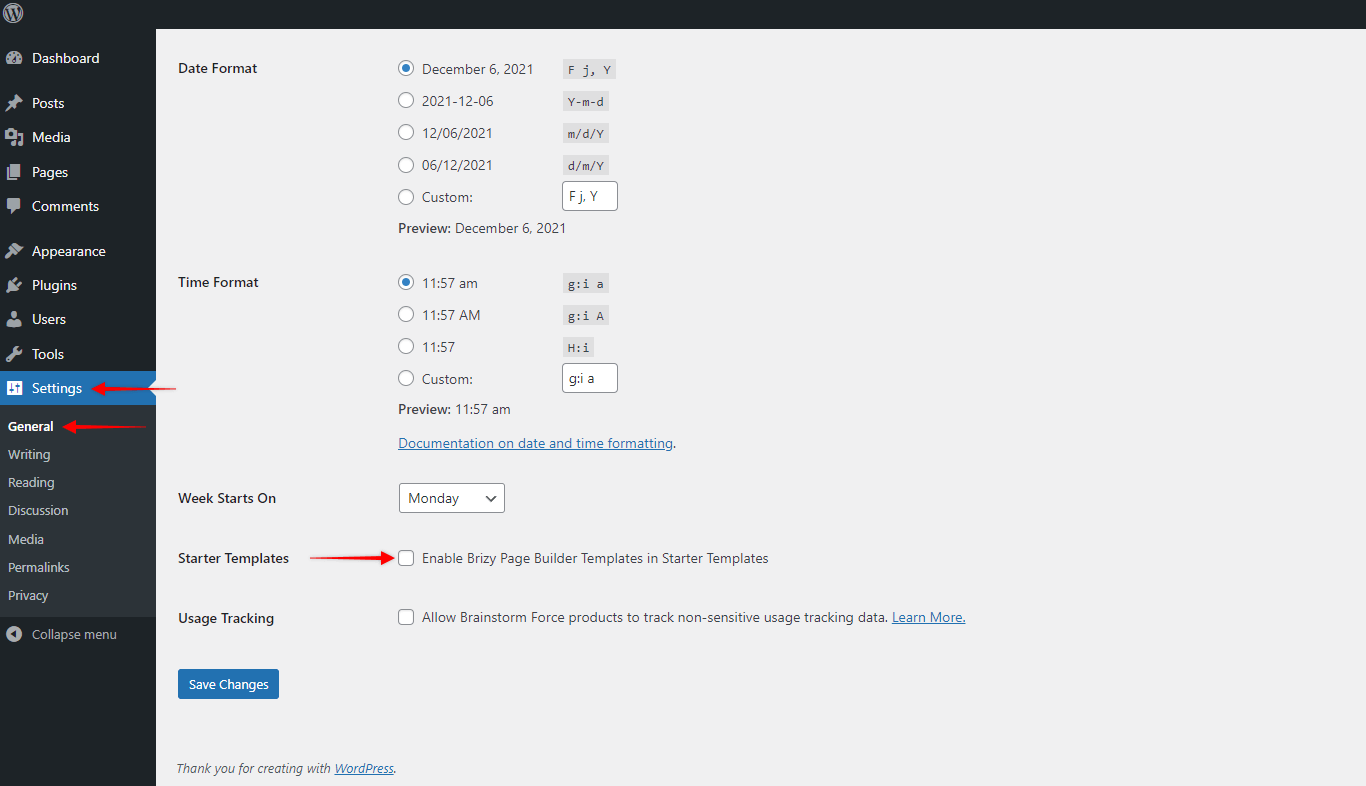
Note:
Brizy builder templates are not available by default. Accordingly, if you wish to import Brizy templates, you’ll need to enable this option. To do this, navigate to Dashboard > Settings > General and click on “Enable Brizy Page Builder Templates in Starter Templates”. See the image attached here.
Step 2: You can browse the Library to see the templates available for your selected page builder.

Once you find the template you like, click on it to preview your template. You will go through several pages with styling settings like logo, colors, and typography.
On each step, you can preview the entire template using the live preview on the right side. Just click on any page in the menu like you would on the live website.
Starter Templates Styling Options
Step 3: Firstly, you can add your logo to see how it would look with the selected template:
- Click on the “Click to Upload” button;
- Upload the logo file or add it from the Media Library;
- Set the logo width.
Here, you can also try different logo variations to find which one fits the best.

You need not worry if you don’t have your logo ready. Just click on the “Skip & Continue” button below. This will add a default logo from the template, which you can change later;
Step 4: Next, you can select one of the premade global color palettes. Selecting any premade color palette will change colors in the template preview accordingly. Also, you can leave the default color palette. Once you decide on the color palette to use, select it and click “Continue”.

Step 5: Finally, you can select one of the available typography presets and try different text styles. Text in the template preview will change its style accordingly.

Click the “Continue” button to proceed to template import. Skipping this step will apply the default typography to your import;
Note:
You will be able to manually modify all settings after the template import. In other words, you can change the logo, colors, and typography any time you want.
Importing A Complete Site Template
Step 6: On the next screen, you can add features that you’d like to import with your website. For example, selecting “Video Player” will add the Presto Player plugin and all its features already set up on your site.

Step 7: After you go through the template preview and settings, you will come to the importing page. Here, you will have several “Advanced Options”.
- Maintain previous/old data: This is for users who already imported a template before. If you enable this option your old data and content will be maintained.

Click on “Submit & Build My Website” to initiate the import process. Don’t close the window until the template import process is finished.
Note:
If you see the “Get Access” button instead, you are trying to import Premium templates using the free Starter Templates plugin. Also, this could mean you didn’t activate your Premium Starter License.
Step 8: Once the import process is completed, you can view your website by clicking the “View Your Site” button.

The “Visit Dashboard” button will redirect you back to your WordPress dashboard.
Importing Premium Templates
Premium Templates are available only with Essential or Business Toolkits. You can set them apart in the templates library by the Premium tag in the upper right corner.

To import Premium site templates, you need to install the Premium Starter Templates plugin.
Once the Premium Starter Templates license is activated, you can import the Premium templates. Please follow the same above-mentioned steps for importing free templates.
Recommendation:
Though not required, we recommend you import a site template on a clean WordPress installation. Also, you can reset your current WordPress installation to start fresh with the brand-new site. Here’s a quick guide to help you do that.
Build Complete Websites With AI
Click on the “Build With AI” option on the first step to build a complete site with AI.

Our AI will let you create a custom complete website outside of the classic Starter Templates. To learn more about these features, click here.
The “Premium Template” Screen – Importing a Premium Template
If you’re trying to import a premium Starter Template and see the “Premium Template” label along with a prompt to Get Access, it means the template you’re trying to use requires a valid license key to proceed. Although the Premium Starter Templates plugin is installed and active, the license still needs to be activated to unlock premium templates.
Secondly, to import Premium templates, you also need to activate your Premium Starter Templates license. Thus, if you haven’t done this, you will see the “Unlock Access” page though your plugin is installed and activated.
Hence, this is what you can do to activate your Premium Starter Templates plugin license:
Step 1: On the template import screen, you’ll see a message under “Premium Template” that says: “Access this template and all others with Essentials & Business Toolkit package…”
If you’ve already purchased the required bundle, click the “Already purchased?” link located just below the Get Access button.

Step 2: A new field will appear prompting you to enter your License Key. Paste your key into the box labeled “License key”.

Step 3: Click the “arrow” button, and continue with the template importing process from the previous step.
Note:
Although we try to use stock and non-copyrighted images on all of our Starter Sites/templates, we cannot take legal responsibility for any claims. We highly recommend replacing the images after importing.
That’s all! If you have any more doubts, please feel free to contact our support. We’re always here to help.
We don't respond to the article feedback, we use it to improve our support content.